

A site logistics plan and a construction phasing plan are close cousins, and most GCs end up asking for both in the same bid package. The logistics side answers “how does this site work while we’re building on it” — cranes, gates, truck routes, staging. The phasing side answers “how does the footprint change as the job moves forward” — what’s active in month three versus month fourteen, and what the site looks like at each milestone in between.
I build these for a living, so this isn’t a marketing description of what a logistics plan is. It’s the section-by-section breakdown of what actually goes into one, and why each piece earns its place in a bid or pursuit exhibit.
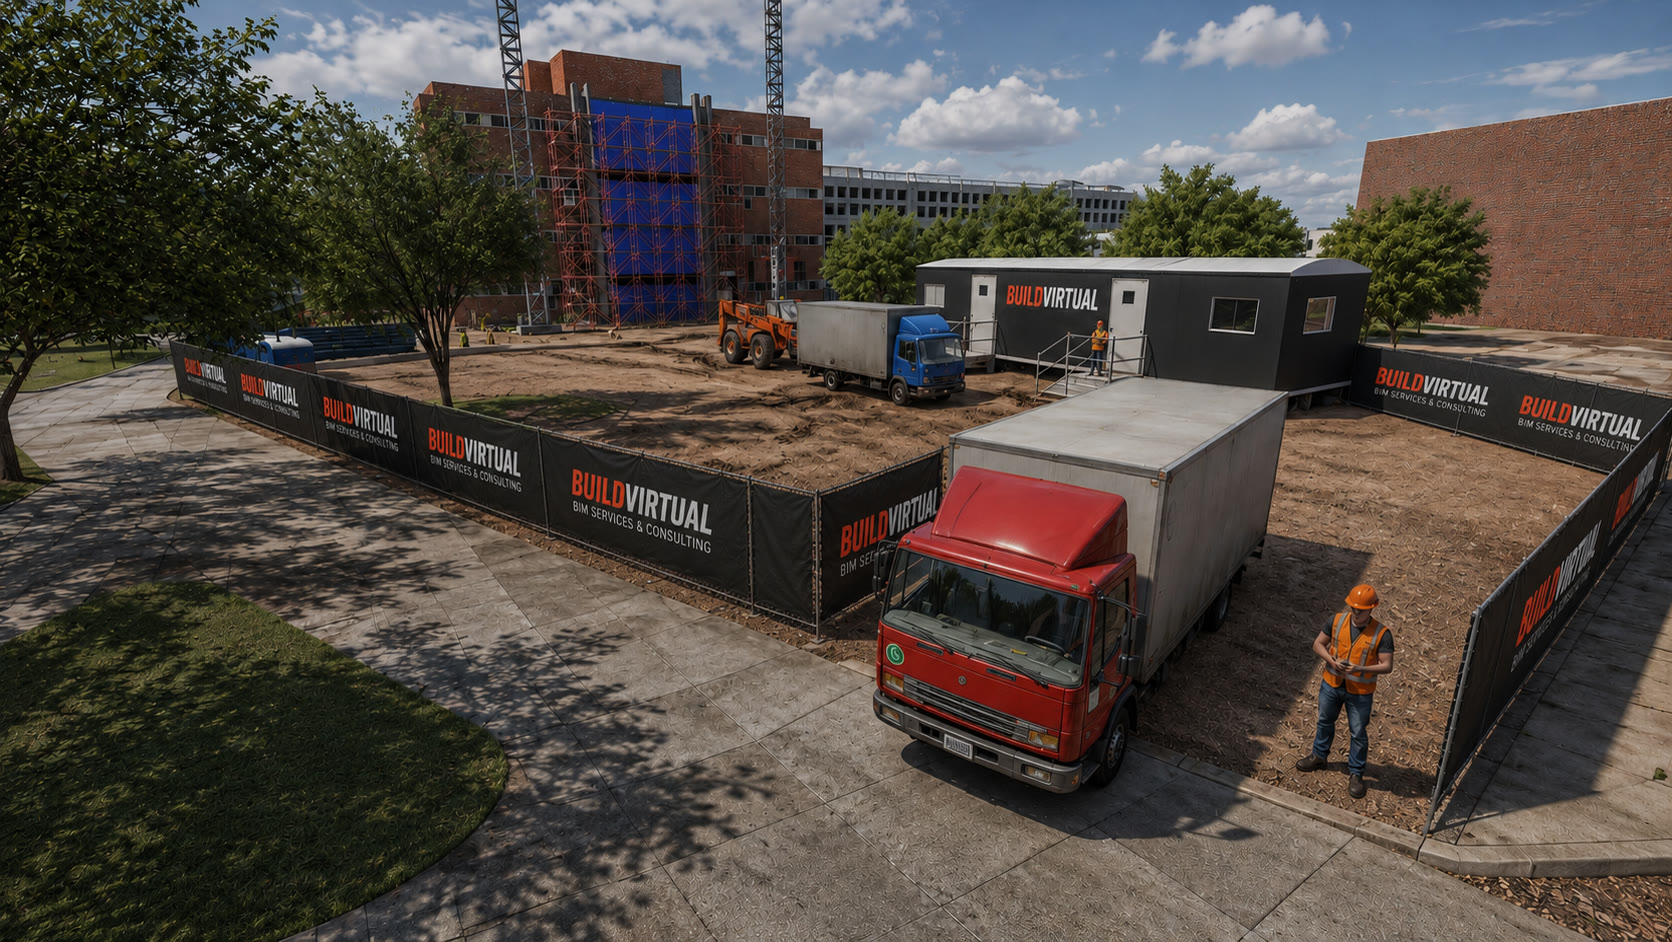
What the Plan Is For
A construction phasing plan shows up in a few places: bid and pursuit exhibits, interview boards, preconstruction kickoff meetings, and owner updates once the job is underway. It’s usually delivered as a set of annotated PDF or JPEG sheets — some teams call it a site logistics drawing, others a phasing exhibit — sometimes standalone, sometimes paired with a 4D construction animation that plays the same sequence out as video. The static sheets carry the plan on paper. The animation carries it in the room.
Either way, the job is the same: prove the team has solved the hard parts of the site before anyone breaks ground. A narrative paragraph in a proposal asks a reviewer to take your word for it. A logistics and phasing exhibit shows them the crane reach, the truck route, the fence line — and that’s a different kind of trust. I’ve written before about how construction animations win bids; a static logistics and phasing exhibit works on the same principle, in a format built for a printed submission instead of a screen.
What’s Actually on the Sheet
A complete construction site logistics plan usually breaks down into the following pieces. Not every project needs all of them, but this is the checklist I work from.
Crane Placement and Swing Radius
Crane location is usually the first thing a reviewer looks for, because it tells them whether the team understands the site’s real constraints. A crane logistics plan shows the base location, the swing radius, and where that radius overlaps a property line, a street, an occupied structure, or another crane on a multi-crane site. It also marks the picks that matter — long-lead structural steel, precast panels, mechanical equipment — and any restricted zones the swing can’t cross, whether that’s a live roadway, a neighboring building, or an easement.
Site Fencing, Gates, and Pedestrian Protection
Where the site boundary sits, where the gates are, and how pedestrians and the public stay separated from active work. On an occupied site or a tight urban lot, this is often the detail an owner cares about most, because it answers their actual fear: will my people, my tenants, or the public be safe while this is happening around them.
Truck Routing and Traffic Control
Delivery paths, the truck entrance and exit, any street closures or lane restrictions, and where flaggers get posted. On a downtown site this section can run as detailed as a full traffic control plan — mapped onto the real street grid, not a generic diagram — because that’s usually what the city and the owner both want to see before they sign off.
Laydown and Staging Areas
Where material gets stored, where it stages before it moves into the building, and how that footprint shrinks or shifts as the site fills in. Early in a job there’s more room to stage; by structure and skin, staging space is usually the tightest constraint on the whole site, and the plan needs to show how the team handles that squeeze.
Jobsite Trailer and Office Placement
Where the field office sits, and — just as important — where it moves to if the site needs that footprint back for a later phase. A trailer placed without a phase-two plan is a common gap reviewers notice.
Excavation and Foundation-Phase Logistics
This phase gets its own section because it carries the most underground risk. Utility coordination, shoring, and dewatering all show up here, along with a detail that’s easy to skip and expensive to get wrong: sleeve and block-out coordination. I come at this from the concrete-coordination side of the business — planning penetrations and block-outs before a foundation pour, not after — and that habit carries into how I build this part of a plan.
A logistics exhibit that shows the utility conflict before the pour is worth more than one that looks clean and finds out otherwise in the field.
Structure, Skin, and How the Footprint Changes by Phase
This is the phasing half of the exhibit, and it’s where the plan stops being one static picture and starts being a sequence. Each milestone gets its own view: structure rising, the building going weather-tight, one area handed over while another is still mid-build. On a multi-building or multi-phase site, this section is what shows a reviewer — or an owner staying operational next door — exactly which part of the site is active at any given point, and which part is theirs to use again.
A Site Logistics Plan Example, Walked Through
The fastest way to understand a site logistics plan is to read one. Below is a representative example — a generic urban mid-rise site, not a client project — annotated the way a real sheet gets annotated.
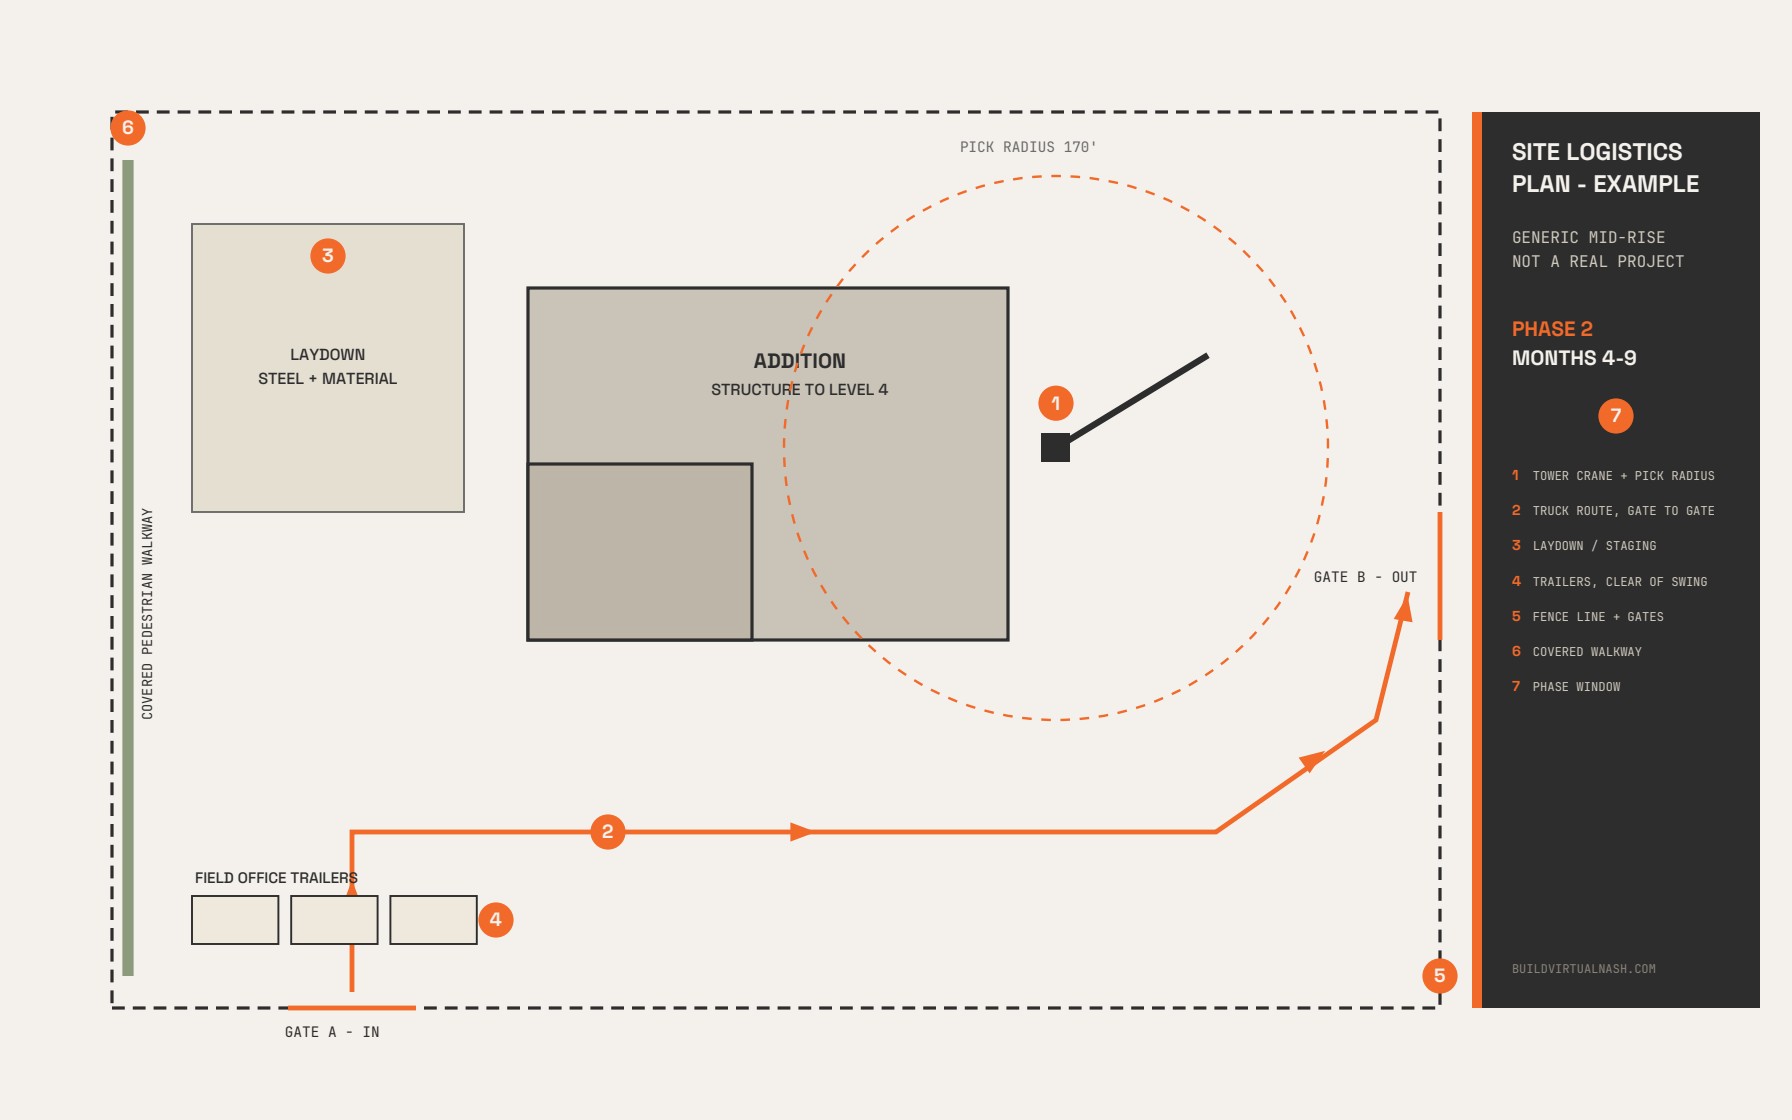
Start at the crane. Its position is the first decision on the sheet because everything else arranges itself around the pick radius — where steel and material can actually land. The radius arc is drawn, and anything outside it needs a second lift plan or a different laydown spot.
Follow the truck route next. One gate in, one gate out where the site allows it, with the turning radii checked against the delivery vehicles the job will actually see — a concrete truck and a 53-foot flatbed don’t bend the same way. The route stays clear of the pedestrian protection, and the flagger positions sit where a driver meets the public way, not where they’re convenient to draw.
Then the zones: laydown sized to the phase (steel erection needs more ground than interior fit-out), trailer placement out of the crane’s swing, temporary fence lines with their gates, and the pedestrian path — covered walkway where code requires it — routed so a person never shares a gate with a truck.
Finally, the phase stamp. A logistics sheet is true for a window of time, and the example carries its window in the title block: what month range it covers, and which milestone changes it. The month-three sheet and the month-fourteen sheet are different drawings, and pretending one sheet covers the whole job is the most common mistake on DIY plans — the site in excavation and the site in skin-and-finish don’t work the same way.
Every element above answers a question someone will actually ask — the owner, the city, a neighbor, a sub scheduling a delivery. That’s the test of a good sheet: it’s not decoration for a bid, it’s the operating manual for the site.
From Sheet to Sequence
A logistics and phasing plan and a 4D construction animation come from the same source: a model tied to a schedule. The static sheets are milestone snapshots pulled from that sequence; the animation is the same sequence played back in motion. Building the plan as a set of sheets first is often the fastest path to a full animation later, because the sequencing and phasing logic is already solved — the exhibit becomes the storyboard, not a separate exercise.
That’s also why I’d rather build these from your actual drawings, model, and schedule than from a marked-up aerial alone. A marked-up site plan is a fine starting point — I turn those into finished exhibits regularly — but the more real project information I have, the more the plan reflects how the job will actually go together, not just how it looks on paper.
Built by Someone Who’s Stood on the Site
A generic logistics diagram is easy to spot: crane symbols dropped in without checking the swing against the actual roadway, a truck route that ignores a turning radius, staging shown in a spot that’s gone by phase two. I’ve spent 10+ years in construction and VDC, including four on-site, and that field time is what keeps a plan honest — the sequence has to be buildable, not just presentable.
It’s the same standard I’ve carried on projects like Neuhoff Development ($550M, Nashville) and 600 Guadalupe ($325M, Austin) — work built from the real model and the real schedule, not a template.
A few things worth knowing about how I run this work:
- Turnaround. A typical logistics and phasing package takes about 10 days, and five days is the minimum. Pair it with a full 4D animation and the typical timeline runs closer to two weeks, with a rush option when a pursuit deadline is tight.
- Exclusivity. I work with one team per pursuit, never a competitor chasing the same job. Engagements are reserved first come, first served.
- Confidentiality. The work stays between us unless you give permission to share it — your competitors don’t hear about it from me.
- Co-branding. Exhibits go out under your team’s identity, built to sit inside your submission, not to promote mine.
What I Need to Start
The fastest path is a design model and a schedule — that’s enough to start placing cranes, routing trucks, and blocking out phases immediately. Short on either one? I’ve built complete logistics and phasing exhibits from drawings and a marked-up site plan, which is often where a pursuit actually starts.
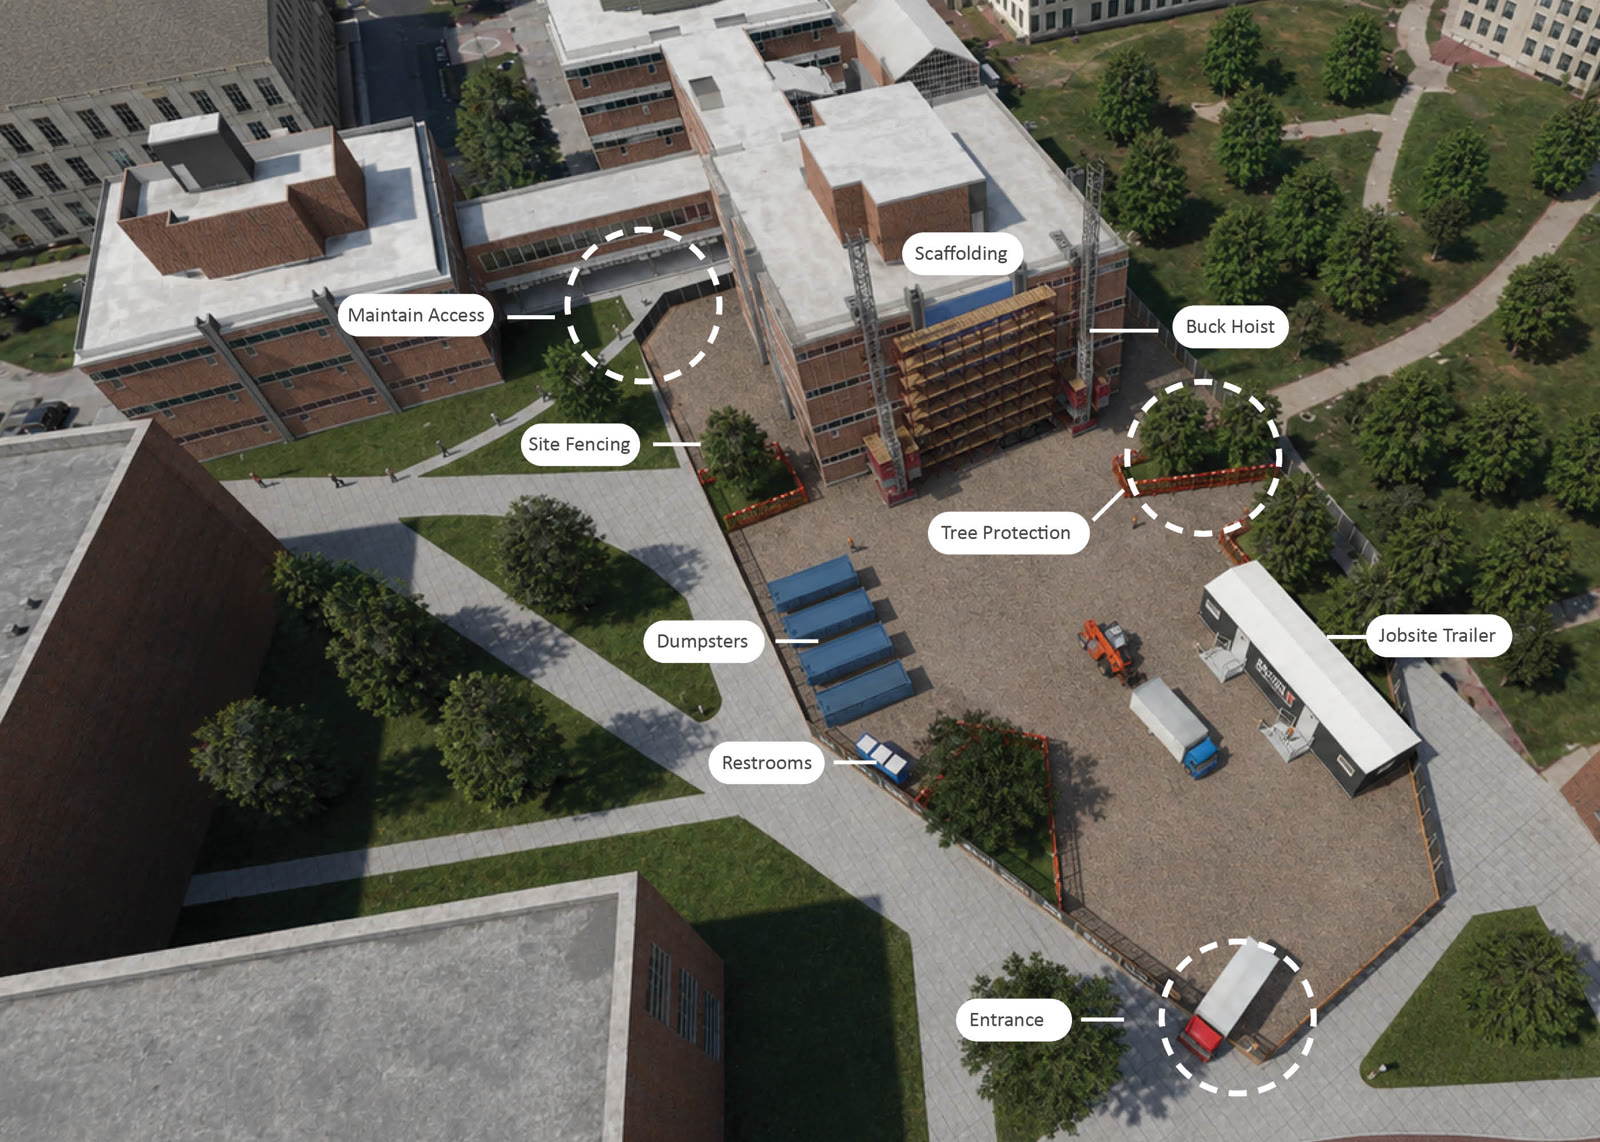
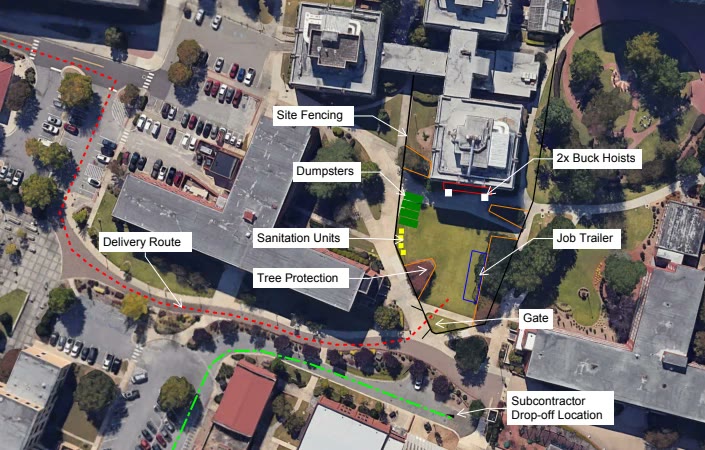
Either way, the earlier I’m in the loop on a pursuit deadline, the more of this list gets covered before the interview.
Frequently asked questions
What's the difference between a site logistics plan and a phasing plan?
A site logistics plan covers the conditions of the site itself — crane placement, gates, truck routing, staging, trailer location. A phasing plan shows how the footprint and the building change over time, milestone by milestone. Most bid packages need both, and they're usually built as one combined exhibit.
Does a logistics and phasing plan replace a 4D construction animation?
No — they're the same underlying sequence in two formats. The plan is a set of annotated sheets for a printed submission or a board; the animation is video for the interview room. Many pursuits use both, built from the same model and schedule.
How fast can you turn around a logistics and phasing plan for a pursuit deadline?
A typical logistics and phasing package takes about 10 days, and five days is the minimum. If it's paired with a full 4D animation, plan on the typical two-week animation timeline — tell me your interview date and I'll work backward from it.
What do you need from us to build one?
A design model and schedule is the fastest path. Without those, I can work from drawings and a marked-up site plan — most pursuits I take on start with exactly that.
Will you work with a competing team on the same pursuit?
No. I work with one team per pursuit, never a competitor chasing the same job, and engagements are reserved first come, first served.
Who typically needs one of these plans?
General contractors and pursuit teams building bid and interview packages, and developers who need to show owners or communities how a site stays safe and functional through construction. It shows up in preconstruction planning too, not just the pursuit stage.
What does a site logistics plan example look like?
A plan-view drawing of the site with the crane and its pick radius, truck routes and gates, laydown and staging zones, trailer positions, temporary fencing, and pedestrian protection — annotated, and stamped with the phase window it covers. The example in this article walks through each element in the order a reviewer reads them. A logistics plan is drawn per phase, so a full set is several sheets, not one.
Can I use a site logistics plan template instead of having one built?
A template gives you a legend, not a plan. Crane radius, truck turning paths, laydown sizing, and pedestrian routing all come from your site's actual geometry and your schedule's actual phases — the parts a generic template can't know. Templates are a fine way to standardize your title block; the content has to be derived from the project.